 If you haven’t tried vegetables on your grill, you are really missing out. Grilled corn on the cob is my all-time favorite. My Secrets of Grilling Corn on the Cob post is THE most popular post on Outdoor Cooking Magic. Memorial Day is almost here and that traditionally kicks off the summer barbecue season and corn on the cob is usually available by then, so if you are grilling this Memorial Day, make sure that you are also grilling corn on the cob. There are lots of ways to grill corn on the cob–I’m going to share two of my favorites.
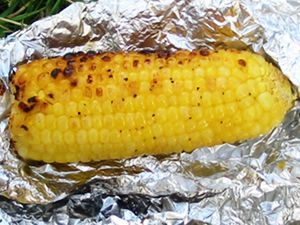
The first way that I like to grill corn on the cob uses foil. All you do is take a ear of corn that has been husked and has the silk removed, rinse it well, wrap the rinsed corn in a piece of aluminum foil and put on the grill. Turn it about a 1/3 of the way every 10 minutes and cook for a total of 30 minutes. You should get a slight charring which really enhances the flavor of the corn. One of the tricks is to make sure you leave some of the moisture on the corn after you rinse it, before you wrap it in the foil. That will help keep the corn from burning and provide a little bit of steam to help it grill nicely.
If you like, you can also spread some butter or margarine on the corn with a pastry brush before you close up the foil. Sprinkle some salt and pepper on it, and you’ll be ready to eat as soon as the corn comes off the grill. You might try other spices as well for an entirely different flavor. A light sprinkling of chili powder, onion powder, or oregano will all give a different but wonderful flavor to your corn.
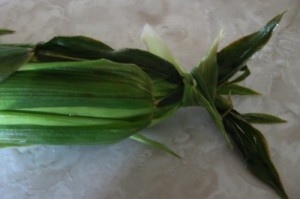
The second way I like to grill corn on cob cooks the corn right in the husk. Pull back the corn husks, but don’t remove them. Remove the silk and then replace the husks, securing them together at the top of the cob with a piece of twine or a piece of the husk (I tear thin strips from some of the outer husks and use them to secure the husks).
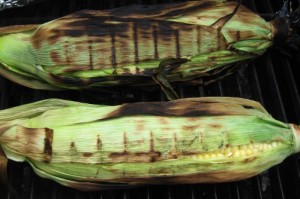
Soak the ears of corn in water for at least an hour. You want those husks to soak up as much moisture as possible. After soaking the ears, place them on the grill for about 30 minutes, turning each ear as the husk turns white, yellow, and then brown. The moist husks steam the corn and keep it from burning while the smoky flavor gives the corn a delicious taste.
Remove the ears when done and take off the husks. If there are burnt pieces of husks on the corn, just rinse them off and serve. Add your favorite flavoring and you’ll have a great side dish for any grilled meal.
These are only two methods. You can also husk the corn and grill it right on the grill without wrapping in foil, letting the heat burn off any silk that remains. When I cook the corn like this, I like to butter and season the corn on the grill as it cooks.
For an extra treat, grill the corn, cut off the kernels and use the kernels in a salad or salsa, or just as a side itself. That will really pump up your side dishes!
This post is part of a series that I’m doing for Angie this month on healthy grilling. In case you missed them, here are the other articles that I’m sharing:
Healthy Grilling Tips
Healthy Grilling: Grilled Salmon on Planks
Healthy Grilling: Grilled Asparagus
Healthy Grilling: Grilled Pineapple
I’m really looking forward to next week’s article. While vegetables are great, fruit can be even better and grilled pineapple is superb. Don’t miss next week’s post!
Scott loves to cook outdoors–his motto is “It always tastes better when it’s cooked outdoors!” Find out more ways to grill corn on the cob and check out his Outdoor Cooking Magic Tricks for tips and recipes for cooking delicious meals right in your own backyard.
Another awesome guest post! Thanks Scott.


I now really, really want to grill some corn! Yum! Thanks for posting this!!
I know! It looks and sounds good. Think we’ll get some to grill for the holiday weekend. Yum!
I cant believe we’ve never done this….